

SEMA has some magical vehicles on display. Even more magical are the clean, eat-off-the-floorpan quality restorations. I’d say most of us are not privy to that level of pristine. For most of us, we spend countless nights wrenching to get a JNC back up on its feet. But, sometimes, we have that one bolt, that one clip that is so easy to see, but impossible to reach. I want to know about your experience:
Tell us your story of a difficult reach while trying to repair or diagnose your JNC.
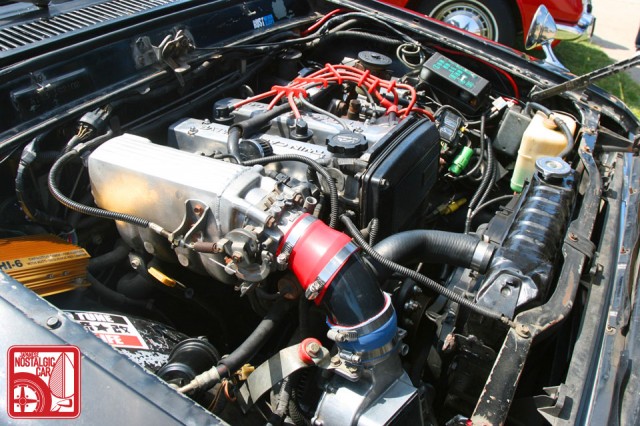
My own tale involves the same engine pictured above (but not my ride). It was my first engine swap. I just got the head back from the machine shop, put it back on and torqued all the head studs, just installed the headers and intake and finally the valve covers. But I had an extra water jacket in the corner of the shed. Oops. I spent three hours trying to tighten two 10 mm bolts on the back of the head. The gap between the head and the firewall was about half as thick as my flat hand. I had to make the “scissor” motion with my fingers while holding a wrench and only getting 1/32 of a turn at a time. To add more stress to the mix was a plastic vacuum sensor with 2 brittle nipples on the end. As I got one bolt secure enough to hopefully not leak, one of those vac nipples snapped when it got clocked by my thumb… Words were exchanged between me and that water jacket. Many words. On my fourth rebuild, I still have that same head minus all the vac lines and that water passage where the jacket would have bolted up to is now welded shut.
The most entertaining comment by next Monday will receive a prize. Scroll down to see the winner of last week’s QotW, “JNC Battle! NSX vs Supra”
Last week we had our first battle. We kicked off with two titans: The Toyota Supra and Honda NSX. Many of you weighed in with experiences, impressions, childhood poster aspirations and racing heritage. In the end, there can only be one winner (of this round at least) and the clear winner is the Honda NSX. Overwhelmingly, the group sang on about how revolutionary the NSX was at the time and why it deserves the win.
I think BW deserves the nod for the excellent post…well several, and Lego inspiration link!
…It’s what a true driver’s car is supposed to be. Connected. Like an extension of yourself. Your mind says to turn and almost instantly, the car turns. As if your hand movements are actually a part of the steering wheel and directly linked to the control arms and steering assembly and all turning simultaneously. Not to mention the throttle response isn’t perfect, it’s better than perfect. It’s as if the throttle is reacting to your inputs before you make the input. And the reliability and cost of maintenance and ownership is insanely inexpensive. In some cases you can pay for 10 years of maintenance on an NSX with just one or two years of maintenance on a similar era Ferrari or Lamborghini. And then there’s the packaging. Everything is put in place with a purpose. Almost like on a Navy ship. Everything has a purpose and is in its place using the least amount of space. Well, the NSX utilizes its space better than most. And even though the trunk space is small in overall size, its shape is favorable to most items you’d purchase or a large enough size for a medium sized suit case and some smaller carry ons…
Omedetou! Your comment has earned you a set of decals from the JNC Shop.


This was not the most difficult to reach of all jobs I performed, but the tally of the time spent in total over the times I had to do this must claim the victory of them all.
On my first AE86 I had a love/hate relationship with my clutch. The clutch itself was an aftermarket part with stronger springs “because race car”. Back then the extra pressure necessary to disengage the clutch didn’t bother me that much. After a while I started to have issues with the clutch: every now and then it would refuse to disengage and I would have a spungy feel in the clutch pedal. A few pumps on the clutch pedal would remedy this temporarily. I suspected air in the hydraulic system, and noticed the fluid was low. So I topped up the fluid and bled the system. This is tedious as the bleed nipple is next to the slave cylinder on the transmission casing, but with the help of a friend pressing the clutch pedal and having the benefit of long arms (I’m 6 foot 5) I managed to do it. However this did not resolve the problem: a week later the problem returned and the reservoir was low on fluid again. I inspected the full system and spotted that the slave cylinder contained a few drops of DOT-4-ish fluid and concluded that must have been the cause all along. So next time with the car up in the air I replaced the slave cylinder with a brand new one. Topped up the system, bled it once more and that solved it.
Well, at least for another two weeks… I investigated the full system once more, checked the master and slave cylinders and concluded my hydraulic system must have a wormhole or something, because that fluid was going to some unknown space beyond my hachi… I simply couldn’t find where it was going to. So out of precaution I replaced the copper line with one from my spares, topped it up, bled the system once again and hoped it wouldn’t return after this. Noteworthy to say: by now I was able to bleed the system myself as I created my own DIY bleeding solution with a small hose and a small reservoir. The process was simple: attach the hose, top up the reservoir, undo the bleeding nipple by stretching all the way down to the transmission, get into the car and push the clutch pedal a few times, return to the engine bay and fasten the bleeding nipple again.
Another two to three weeks later the problem was back. I investigated once again the full system, couldn’t find any leaks and I simply gave up. I kept on topping up the reservoir every week and bleeding the clutch lines whenever I forgot to top it up and the issue arose again.
This continued till the next MOT: the MOT guy checked for rust spots and made a big gash by simply prodding the footwell with a screwdriver. It turned out the clutch master cylinder was leaking, but only between the panel and the thick layers of rust proofing applied to the car by a previous owner. So it wasn’t visible from the outside, nor the inside of the car. I had the footwell fixed and replaced the master cylinder. I’m not sure if I could have prevented the footwell repairjob if I would have replaced the master cylinder in the first place: probably it had been leaking for some time already and most of the underside was already quite rusty.
but do you still have the 86?
I recommend getting the speed bleeders from I think JEGS, can’t remember exactly where i got mine. I did it for the brakes but they should have for clutch too.
This summer i got my car driving after a 4 year build.. a 89′ fc3s
So then i noticed that the the air blower control unit is not working, it only blew cold air and straight to the front dash vents. So it got really cold at night and the windscreen went foggy…
Had to fix that asap!
Inspected the manual and found a connector to check under the dash.
So i took off the gauge cluster and all the switches and trim pieces covering it.
Looked for a quite long time with a flashlight and then saw a beige colored connector with nothing connected to it. It was located just under the dash, between some air pipes and body wiring harness, barely seeable.
So i could.only reach it from under could barely touch it with my fingertips, so it took like many hours of gynecology to get it, made some bone bending moves at last and got it connected.
On the way there i found a place for a vent pipe that i couldnt find a place for a long time .
Now it works
Changing the oil filter on a first gen front wheel drive Maxima that just did a 50 mile run on the freeway.
Yeah, that’s loads of fun.
Can’t wait to see all the other Z32 stories that pour in. I’m sure someone will bring up the 36″ extension and 2 wobbles that you need to get to the top of the transmission while the EGR is still on the car.
Mine is the AC compressor on my 300ZX. The Z32 has a pretty standard flat belt setup, complicated by the fact that everything is held together by Nissan DOHC Jenga and torque values are all pure fiction. So, to get the compressor out, you have to pull just about everything in front of it out first. On a TT, that includes the intake pipe from the filter to the turbo, the discharge pipe from the turbo to the intercooler (which is actually two hardpipes and some couplers on mine), the intake pipe from the intercooler to the plenum (a hardpipe and two couplers), the upper and lower radiator hoses (one of which is about 5 feet long and has a 90° bend in the middle, and has to come out the bottom), the radiator fan (which as to be unbolted before the radiator and shroud comes out), and the radiator and shroud. To be extra sure of not breaking anything, you really ought to pull the air pipes on the RH as well, but I’m lazy and I didn’t.
Anyhow, to get to the part about the reach…
Once all the stuff is out of the way, and you’ve pulled the belt and the suction and charge pipes off the compressor body (with a 36″ extension, a wobble, and a deep-socket 12mm), you have to get the four(!) bolts holding the compressor to the bracket. I don’t know what kind of forces Nissan was intending the compressor to see in service, but I can tell you that it would be trivial to destroy the front bearing on the motor by over torquing the belts without even lightly challenging the mounts on this and the other accessories.
The worst of the 4 bolts is the rear. It’s completely blind, you have to go over the top of the compressor with an extension and a crow’s foot socket to get at it, and you can get maybe 1/8 of a turn with each throw, before you have to stick your hand up behind it, and reset the crow’s foot. The first time I did it, it took about 45 minutes of patient cursing and blind fumbling to get it out. I didn’t put it back in.
There is no automotive smell I’ve found that quite outdoes the smell of manual transmission and/or differential fluid.
Now: imagine laying on the floor of a garage and suddenly realizing you’ve laid down head first in a small puddle of the stuff.
One step further: you are currently bench-pressing the transmission of a Miata barely an inch above your face.
Even better: your back is cold because it’s the middle of winter and the concrete is cold.
To keep expanding: while your back is cold (and so are your hands), the air around you is 80deg and wreaks of Kerosene because there’s a torpedo heater blowing under the the slightly opened garage door. The air on either side of the car is 30deg.
…This was the situation I found myself in helping a friend for the first time (for me) doing a clutch change. When it came to changing the clutch on my Miata later that spring, I HAPPILY paid someone to do it.
I have almost the same experience with the transmission fluid. After I got up from the floor, I felt something wet on the back of my neck. It was the transmission fluid that soaked on the back part of my then shaggy hair and proceeded to run down my neck and into my overalls.
My very first attempt at fixing something on my FB was, what I thought, going to be a fairly easy fix. A light. A very small light in a very small heater control unit, which had decided many years ago that it had had enough and quit lighting up the words “Vent”, “Def”, and “Heat”. It was such a little thing. I almost considered not even messing with it. But after a few evenings of being in the car, it really started to bug me. “OK, I guess I’ll replace that bulb…it’ll a nice, easy, first thing I can do with this car.”
A car which was alien to me and had some problems…a flooding carburetor, a sloppy steering box, and rattles from god knows where. But this should be easy. A fine way to ease into getting to know the car. This was in November…shortly after I’d gotten the car.
So I went to work disassembling the center console. Unlike my old Civic, there were virtually NO visible screws. Everything was cleanly hidden from view by snapped on facias, all of which had to come off in a certain order. It took 3 trips to rx7club.com and a fair amount of searching before I got to the point where I had the center console apart and access to pull the heater panel. A heater panel that did *not* want to come out. It was attached in the back by a molex plug and some round plug. There was no possible way for my hand to get in there and successfully coax the plugs apart. Several scans of the parts manual refused to give up the secrets that kept that heater control firmly affixed to the center dash. To add insult to injury, it offered no real reassurance that the bulbs were, in fact, replaceable. A call to my local Mazda dealer did nothing to reassure me either…the parts guy couldn’t even read the parts manual they had…which was the same crappy scan of a microfiche from ’85 that I was reading. He had no clue and, from the sound of it, didn’t want a clue.
Questions were posted to rx7club.com, which were met with resounding silence. Nobody knew. It was an ’84-85 thing. Probably nobody had tried. Or nobody cared. Or both.
I left the console out, looking rather untidy with the resolve that the console would NOT go back in until I had replaced that bulb.
Fast forward to 8 months later. I went in the garage with the resolution that I would do one of two things. Pull that heater out and see if the bulb is replaceable, or throw in the towel and put everything back together. I was tired of the car looking like a theft recovery. It’s a #@$! lightbulb! I probably wouldn”t even drive this thing in the dark more than a couple of times a year. But it tasked me.
Armed with my LED light wand and reading glasses, I looked at the heater from every angle I could. I could see the two plugs. I could get one hand kinda up in there, but I just didn’t have the leverage to pull the molex apart with one hand, I noted, however, I was able to pull the heater control out just a little bit. Enough to expose 3 screws on the top of the front panel. I wasn’t sure exactly where the light bulb would be, but I suspected it would be behind the panel there somewhere, so I got a stubby phillips screwdriver. I couldn’t get it in the screws…the heater wouldn’t’ come out far enough to clear the dash so I could get access to those screws. Then I remembered. And I dug around in my tool box and found a little chintzy, “Made in China” screw driver ratchet thingy. I was able to get that thing in there with room to spare. Ratcheted out 3 screws and popped the top panel off and what do I see? A light bulb with an orange rubber condom on it. It’s attached with a little twist-lock thing which I had very little access to, not being able to get the whole control unit out of the dash. But a pair of needle nose pliers managed to twist the bulb enough to coax it out of its home.
It was such a stupid little thing, but it had been dogging me for so long, I felt even better than when I’d finally swapped the rear end or got the coil overs on. Logical, no. But damn, I felt great after that.
The question is, were you able to reuse the orange condom bulb cover? Or did it rip like mine did when i replaced the AE86 bulb in my heater panel?
Believe it or not, the condom survived!
Audi A6 C5V8, changing the oil cooler water pipe. A sawn off hex bit in a 6mm socket on a 1/4″ UJ on two extensions to a ratchet that was jammed up against the chassis rail. This after removing the front panel complete with grille, lights, radiator, etc. And removing an engine mount, while jacking up the engine on one side.
All this achieved was to loosen the bolts. Then I had to actually get the oil cooler out, which involved twisting it while pulling it in exactly the right direction. All for a 2″ piece of plastic pipe remarkably similar to a 10c irrigation part.
On the plus side, I replaced it with an alloy billet after market pipe, and the front was already off the car for a cam belt change.